Deploying Your First Node.js and Socket.io App to Heroku
At my office we like to shoot each other from across the room with Nerf guns. In an effort to actually remain productive we've implemented a rule that whenever you get shot you're dead for 1 hour. But that hour can be a little tricky to keep track of between players. Who's dead and who isn't? Am I about to be shot right now??
In an effort to keep track of things (and also because I need to write a blog post) I decided to start working on a little Node.js and Socket.io app. In this first post I'm just going to get things setup and deploy them to Heroku. Hopefully tomorrow we can work on implementing the actual timers. If you've never worked with Heroku before you'll need to follow their getting started guide to make sure you have all the proper command line tools. Don't worry, it's really easy and their documentation is awesome.
Express it!
To start us off we'll use Express since it provides a nice, Sinatra like layer on top of Node. If you haven't installed Node yet you can do it from the Node.js site. The installer will also include npm which is Node's package manager. Following the instructions on the Express site you should be able to just type:
npm install -g expressNow that you have Express installed you can use it to create a new project.
express defconI'm calling my project defcon because I luvz WarGames. You can call yours whatever you'd like :)
Next we need to cd into the defcon folder so we can install Socket.io and our other dependencies. There's a version of Socket.io designed to work with Express so we'll install that one.
npm install -d  # install Express dependencies
npm install socket.io express
We'll also need to add socket.io to our package.json which is similar to a Gemfile if you're coming from Ruby, or just a big list of file dependencies if you're coming from something else :D When you distribute your app other developers can just run 'npm install -d' and it will add all of the modules listed to their project. Heroku will also use our package.json when we push our app to their servers. I'm also going to replace the Jade rendering engine with EJS since it's easier for me to work with.
{
  "name": "defcon",
  "version": "0.0.1",
  "private": true,
  "dependencies": {
    "express": "~2.5.8",
    "ejs": "~0.7.1",
    "socket.io": "~0.9.6"
  },
  "engines": {
    "node": "0.6.x"
  }
}
The tilde ~ character tells NPM that it's ok to install this version of our module, or anything less than the next highest version number. So the following are equivalent: "~1.2" = ">=1.2.0 <2.0.0". This is typically a good practice with modules because you'd like to receive bug fixes and patches but you don't want to let your app potentially download a v2 of some library which breaks the API.
Run npm install -d again to make sure that ejs and anything else you've added are properly installed. Open up your app.js file that Express provided for you. We'll need to change a lot of stuff so it's probably easiest for you to just copy and paste this one that I've already prepared. Paste it into a new file if you'd like so you can compare all the differences.
var express = require('express'),
  app = express.createServer(express.logger()),
  io = require('socket.io').listen(app),
  routes = require('./routes');

// Configuration

app.configure(function() {
  app.set('views', __dirname + '/views');
  app.set('view engine', 'ejs');
  app.use(express.bodyParser());
  app.use(express.methodOverride());
  app.use(app.router);
  app.use(express.static(__dirname + '/public'));
});

app.configure('development', function() {
  app.use(express.errorHandler({dumpExceptions: true, showStack: true}));
});

app.configure('production', function() {
  app.use(express.errorHandler());
});

// Heroku won't actually allow us to use WebSockets
// so we have to setup polling instead.
// https://devcenter.heroku.com/articles/using-socket-io-with-node-js-on-heroku
io.configure(function() {
  io.set('transports', ['xhr-polling']);
  io.set('polling duration', 10);
});

// Routes

var port = process.env.PORT || 5000; // Use the port that Heroku provides or default to 5000
app.listen(port, function() {
  console.log(
    'Express server listening on port %d in %s mode',
    app.address().port,
    app.settings.env
  );
});

app.get('/', routes.index);

var status = 'All is well.';

io.sockets.on('connection', function(socket) {
  io.sockets.emit('status', {status: status}); // note the use of io.sockets to emit but socket.on to listen
  socket.on('reset', function(data) {
    status = 'War is imminent!';
    io.sockets.emit('status', {status: status});
  });
});
In my views folder I've created a layout.ejs...
<!DOCTYPE html>
<html lang="en">
  <head>
    <meta charset="utf-8" />
    <title>Title</title>
    <meta name="description" content="" />
    <meta name="author" content="" />

    <!-- HTML5 shim, for IE6-8 support of HTML elements -->
    <!--[if lt IE 9]>
      <script src="http://html5shim.googlecode.com/svn/trunk/html5.js"></script>
    <![endif]-->

    <!-- styles -->
    <link href="/css/main.css" rel="stylesheet" />
  </head>
  <body>
    <%- body %>
    <script src="/socket.io/socket.io.js"></script>
    <script src="/js/libs/jquery.js"></script>
    <script src="/js/main.js"></script>
  </body>
</html>
and an index.ejs.
<div id="status"></div>
<button id="reset">Reset!</button>
If you'd like you can open up routes/index.js and look around but you don't need to. It should render layout.ejs and index.ejs by default.
A few more items to go...We need to add a copy of jQuery to our public folder and also a main.js file. I've renamed the structure to look like this:
public
|
|_ css
|_ img
|_ js
    |_ libs
        |_ jquery.js
    |_ plugins
    |_ main.js
I guess that's just a habit of using Backbone Boilerplate all the time :) Here's what main.js should look like:
var socket = io.connect(window.location.hostname);

socket.on('status', function(data) {
  $('#status').html(data.status);
});

$('#reset').click(function() {
  socket.emit('reset');
});
It's important to note the line that says var socket = io.connect(window.location.hostname);. In the socket.io docs they usually tell you to connect to localhost but since we're on heroku we'll need to instead connect to whatever our custom domain is.
Cross your fingers
At this point we should be ready to test everything. From the root of your project run node app.js. If all goes well you should see something like this:
  info  - socket.io started
Express server listening on port 5000 in development mode
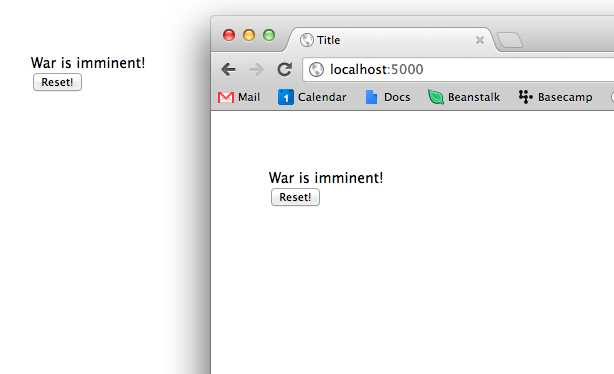
If not leave me a comment and I'll see if I can help you debug it. However let's assume that everything DID go well for you and now you're ready to connect to the local version of your app. Point your browser to http://localhost:5000 and you should see something like this:

Now open another browser window and also point it at localhost:5000. In one of the windows click the button that says Reset which should change the copy in both windows to 'War is imminent!'
Git'er done!
Alright we should have a functioning app at this point so let's put this baby into Git.
git init
echo 'node_modules' >> .gitignore
We'll ignore the node_modules directory so Heroku can create its own version. Heroku requires that we deploy our app from Git which is kind of an awesome practice. We'll also need to define a Procfile which will list the processes that our app can run.
touch Procfile
echo 'web: node app.js' >> Procfile
To verify that our Procfile is working we can use Heroku's built in utility called foreman.
$ foreman start

23:47:32 web.1     | started with pid 53197
23:47:32 web.1     | info: socket.io started
23:47:32 web.1     | Express server listening on port 5000 in development mode
Point your browser to localhost:5000 to verify that things are still working. If everything looks good we're ready to commit to git.
git add .
git commit -m 'initial commit'
Deploy to Heroku
Now that our app is safely tucked away in git it's time to fire up a new Heroku instance.
$ heroku create --stack cedar
Heroku will do the work of setting up a new git remote for us to push our app to.
$ git push heroku master
We'll need to scale our web process before we can use the app.
$ heroku ps:scale web=1
To see which processes are running on Heroku you can use the heroku ps command.
$ heroku ps

Process       State               Command
------------  ------------------  --------------------------------------------
web.1         up for 10s          node app.js
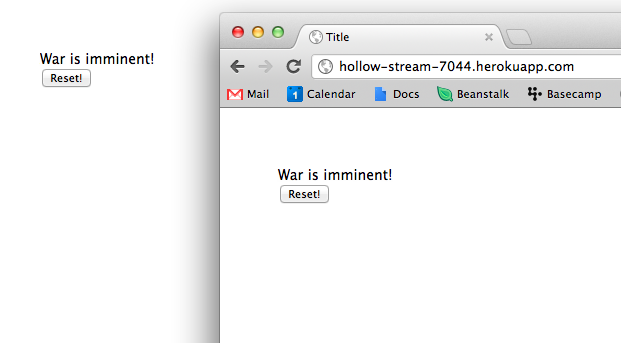
With everything setup we should be able to run heroku open which will fire up our browser and direct it to an instance of our app. There seems to be a fair bit of latency so it can take several seconds for the initial status of 'All is well' to show up. If you see the Reset button with nothing above it give it around 10 seconds to see if it eventually updates. Open another browser window and point it at the Heroku domain in the address bar. If you press the Reset button in one window it should immediately update in the next one.
Wrapping up
Well I hope you enjoyed this brief tour of Socket.io and Heroku. Before we sign off let's make sure to turn off the running process on our Heroku instance:
$ heroku ps:scale web=0
If all went well you should have a decent starting point to build your own Socket.io app. If you're still having trouble checkout some of the great documentation from Heroku and/or leave a comment:
https://devcenter.heroku.com/articles/nodejs
https://devcenter.heroku.com/articles/using-socket-io-with-node-js-on-heroku
Good Luck! - Rob
You should follow me on Twitter here.
- Mood: Tired, Antsy
- Sleep: 5
- Hunger: 0
- Coffee: 1